Silent computing: once a myth, today a necessity. Learn how to quiet down those annoying noises from your PC in the easiest possible way
I've seen plenty of articles on silent computing, however the pros usually talk about advanced techniques that scare most people not willing to rip apart their hardware parts. In fact, silencing down your PC to a quiet whisper is usually a relatively simple task, and it can be done by most users. Since I'm quite a silencing fanatic, and the weekend is always slow on tech news, I'll write a simple how-to for people who want their PCs to be quieter but just never took the time to learn how to do it.
First, let's go over some of the basic concepts of silent computing. In your PC, the main source of noise are the fans. Usually a PC has 4 of them - CPU fan, video card fan, motherboard fan (usually cooling the northbridge chip), and the PSU fan. Additionally, some PCs might have one or more intake/outtake fan, which blow cool air in and warm air out of the case, effectively cooling most of the components inside a PC. Other noise sources are CD/DVD drives, floppy drives and hard disks, but when you're at the stage that your hard disk is the loudest component, your PC is already very quiet.
Since there are many different PC configurations out there, I'll base this article on the most common one - aforementioned 4 fans, midi tower, one or two hard disks and DVD drive.
One other thing - I'll also presume that you're trying to quiet down a PC you already own. If you're buying a new PC, it's another matter and it's out of the scope of this article, but I can recommend you to buy a quality CPU fan (Zalman and Scythe are among the companies that make some really quiet fans) and a silent but quality PSU (Antec, Seasonic, Tagan, Zalman, OCZ are the companies I recommend). Also, get an intake and an outtake 12cm fans if your case allows them - their presence will actually reduce the overall noise in the end, because they will cool all components and allow for other fans to spin more slowly). The rule when you buy fans is simple - the bigger the better (which in this case means the bigger the quieter). Best fans are made by Silenx, Nexus, Papst, Adda. Zalman also makes some solid and pretty cheap ones.
OK, let's move on to the actual steps.
1. Get Speedfan
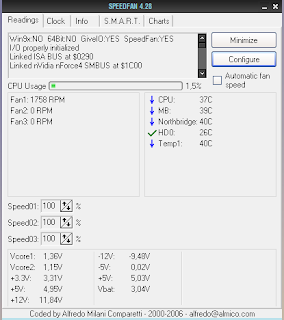
The first and most important item you need is a freeware program called Speedfan. It's a fantastic program which monitors temperatures of your hardware and in many cases enables you to slow down the fans which are connected to your motherboard's fan headers.
 When you install it, in its main window you should see some temperatures and some fan speeds, if there are any fans connected to the motherboard (usually it's the CPU fan and the northbridge fan). Learning which temperature is which can be tricky for beginners. However, the most important one is the CPU fan temperature, and it's easy to find out which one is it. Get Prime95 (a program usually used to stress-test your hardware), open it, click on options, select torture test and start any of the tests. Monitor the temperatures in Speedfan - the one that starts climbing very fast is most likely your CPU temperature.
 Now that you know what your CPU temp is, you should do some research and find out what are the recommended/max temperatures for your CPU. As a VERY general rule of thumb, 45 degrees and lower is pretty cool, 45-60 is moderate but tolerable, 60+ degrees is the upper limit, 70+ degrees is always too hot.
Now, try to control a fan in Speedfan by reducing its speed. Monitor your temperatures and the noise carefully - you should be able to know if it's working or not. Even if it's not working (sometimes it happens, Speedfan doesn't work perfectly with all motherboards), Speedfan is still useful for monitoring your temperatures. If it's working you can now reduce some of the noise, but be careful not to turn down the fan too much - it does have to cool the computer. Play with Speedfan until you're sure which fans are you controlling, how loud they are, and how much you can slow them down without compromising the temperatures of your hardware.
2. Automating Speedfan
Presuming that Speedfan is able to spin down your CPU fan (and possibly others), and that your CPU isn't too hot even when the fan is working at this reduced speed (test it under load, use Prime95 or play a game - if the CPU temp goes over 60 degrees forget about spinning the fan down for now), it's now time to automate Speedfan. Open it and click configure. Click on the "+" next to your CPU temperature, and select all fans that you can control. Select it, and type in your desired and your warning temperature. In my case, I have an Opteron 144 working at 37 C at idle; my desired temperature is 40 and warning is at 52. Now click the speeds tab, select the speed of the fan you are able to control, and set its minimum and maximum speed values, for example 20% speed as the minimum for when your computer is idle and CPU is not that hot, and 100% for heavy load when you're playing games, watching movies or doing something else that heats up the CPU. Now open the main Speedfan window and select Automatic fan speed. Speedfan should soon start lowering your fan's speed, and it will keep it low until your CPU heats over the desired temperature mark, after which it will spin it back up to high. *warning: in the first couple of days you're doing this, monitor your temperatures closely. You CAN burn your hardware components if you're not careful and spin down your fans completely while your CPU is burning or something similar. Standard disclaimer: I cannot be held responsible for any damage caused by following the advice in this article.
3. Rivatuner and DVD/CD speed control
Although sometimes real results can only be accomplished with hardware modifications, my philosophy is that you should always have all the software options for silencing in place. A simple one is some kind of DVD/CD drive speed controller to spin down those noisy drives while you're watching a movie (The CD/DVD doesn't really have to be spinning faster than 1x while you're listening to music or watching a dvd). There are many programs that can do it, one of them is AnyDVD.
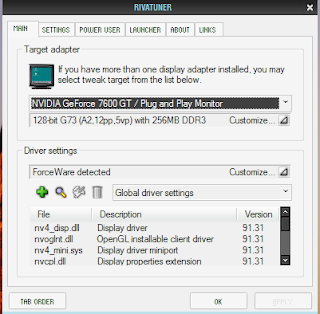
 Secondly, if you have an nVidia graphics card, you might be in luck (I'm not sure if it's possible to do this for Radeon cards as I only have passively heated Radeons). A piece of software called Rivatuner supports tweaking all imaginable options of nVidia cards, including fan speeds on some cards. In its main window, click the arrow next to Customize (under Driver settings), click on System settings, and then on Fan. Here you can choose the speeds of the fans on your video card when in 2D, low power 3D or performance 3D mode. Same rules apply as with Speedfan: monitor the temperatures of your video card (you can find them in the main window, upper Customize, hardware monitoring) and don't let it get too hot. Video card chips can generally withstand higher temperatures than CPUs, so around 70 degrees at full load is acceptable here.
4. Undervolting the fans.
This might not be the logical next step, but it's number 4 because it's very easy. Buy a voltage regulator and connect all your intake/outtake fans (CPU fan is also a possibility; again, be careful not to spin the fan too low because your CPU might burn. Also, have in mind that Speedfan cannot control the fans which are not connected to your motherboard) to it if you have them. A voltage regulator can be a rheobus, like this one, or a simple voltage regulator like this one. These usually aren't expensive, and every decent hardware store should carry a couple of brands. The procedure is simple: plug your fans into the regulator, the regulator is usually connected to the power supply, and you can control the speed of your fans as you please.
If you don't have any fans that you can connect to the voltage regulator (it's best for controlling intake/outake and CPU fans), I would even go so far to advise you to buy at least an intake 12cm fan (if your case permits it) and install it to blow cool air into your case. It will dramatically reduce the temperatures inside your case, even when completely undervolted (and therefore quiet), which will allow to slow down the other fans inside the case.
5. Removing the Northbridge fan
This is the tricky one, but it's often necessary. If your motherboard has a northbridge fan, chances are it's now by far the noisiest thing in your PC. The good news is - you can safely replace it (if you're overclocking, you should definitely have intake/outtake fans to cool the northbridge heatsink) with a completely passive fan (I use Zalman's, and before you ask, no, I'm not endorsed by Zalman in any way - I just like their products). The bad news is - for most people this will be a step too far. It also possibly voids the warranty on your motherboard, so be very careful before you attempt it.
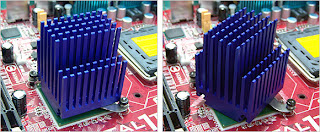
 If you do try it, the procedure is the following. Disconnect all cables from the motherboard, remove it from the PC, and cut off the plastic pins holding the northbridge fan in place. Then, install the Northbridge fan following the instructions provided with it. Usually it looks like this. Then put the motherboard back in its place, connect everything, turn the PC on and enjoy the silence. *warning - this procedure may vary from motherboard to motherboard; from my experience, the plastic pins are usually used by manufacturers for securing the stock northbridge fan.
 I know, it is a huge annoyance having to do all this, but unless you were lucky enough to get a motherboard with passive northbridge cooling, there's no other way around it.
6. PSU
This is simple: if your PSU is too loud, buy a quieter one. If you're a beginner, I simply cannot recommend any kind of modification to the PSU whatsoever. Leave it to the pros, like me (don't ask me how many I've burned so far). In addition to what I've said about PSU brands above, the general rule is that PSUs with 12cm fans will be quieter than others).
7. Finishing touches.
If you followed the above steps, you should now have a decently quiet PC, at least when it's idle - which is usually the most important, because you probably don't care so much about silence when you're blasting aliens or doing some other CPU intensive task. However, there still are a couple of things you can do to further reduce the noise from the PC. First of all, if the CPU cooler you had sucked in the first place, then Speedfan probably can't help it much. Exchanging it for a better one is always an option. If you're wondering why haven't I included this quite logical step while I did include the annoying business of exchanging the northbridge fan, the reason is this: CPU coolers are lately quite well made, even stock ones, and aren't that noisy (especially with a little help of Speedfan). Sure, you can exchange them for a better one, but I wouldn't consider it a necessary option for a beginner. On the other hand, if your motherboard has a northbridge fan, it's almost certainly annoyingly loud, often twice as loud as everything else, which is further emphasized by its small size (usually 60mm) which makes the sound even more annoying. Someone who doesn't want to open their PC will of course skip the business of changing the northbridge fan, but I'm afraid that most of the other measures we've taken here will be in vain.
 Secondly, you can buy noise reduction matting and cover the insides of your case with it to reduce the noise. One of the companies that makes them is Akasa. This takes time, but I don't consider it too dangerous for your hardware, so you can try it if you like. You can also try using rubber bolts and padding for your case fans, and special noise reduction cages for your hard disk(s), although the differences will probably be minor.
 * Hey, I thought this was going to be simple!
Well, some of the software I mentioned here takes time to get used to, and removing the northbridge fan is definitely not a task I would recommend to everyone. However these are the techniques that give you the biggest decibel decrease for your efforts. Those are the things I do first when I want to quiet down one of my PCs, but you can, of course, choose only to do some of them. For most people even reducing the fan noise with software like Speedfan will make a big difference, and they will leave at at that, which is ok.
For the real "silence enthusiast", however dumb that must sound, there are still many advanced techniques to try and things to consider. For a good place to start, I recommend one of my favorite pages: www.silentpcreview.com
Labels: Features, hardware, silent computing


0 Comments:
Post a Comment
<< Home | Digg! | Reddit! | Netscape! | del.icio.us! | Stumble!